
This error usually occurs when you are running an Online Backup and because of some previous failed backups the table spaces are still under back up status.
You need to go to SQL and run the command "alter tablespace PSAPSR3 end backup" for every tablespace that is in backup status.
Once done re-run the Online Backup.
Please refer to the links & Note below for reference:
Note: 7490
Link: https://forums.sdn.sap.com/message.jspa?messageID=5583428
Link: https://forums.sdn.sap.com/thread.jspa?messageID=7841400#7841400
# Please spare some time to put a comment, if this post was relevant for you or not. It helps me post better content.
Monday, September 7, 2009
Friday, July 17, 2009
. Debug timeout parameter
The parameter for this is " rdisp/max_debug_lazy_time " the default value for which is 600 seconds.
You can change it dynamically i.e. it shall take effect without a re-start. It should be set as dynamically switchable via RZ11 -> just enter the parameter press change value -> enter new value and save.
Please do remember that changes done via RZ11 are temporary and they will be gone when the system is restarted.
You can also refer to the SAP Note : 321488 - Handling debugging sessions
# Please spare some time to put a comment, if this post was relevant for you or not. It helps me post better content.
Thursday, July 16, 2009
. Creating BC Sets / Creating Business Configuration Sets
Customizing settings can be collected by processes into Business Configuration Sets (BC Sets). BC Sets make Customizing more transparent by documenting and analyzing the Customizing settings. They can also be used for a group rollout, where the customizing settings are bundled by the group headquarters and passed on in a structured way to its subsidiaries.
BC Sets are provided by SAP for selected industry sectors, and customers can also create their own.
When a BC Set is created, values and combinations of values are copied from the original Customizing tables into the BC Set and can be copied into in the tables, views and view clusters in the customer system. The BC Sets are always transported into the customer system in which Customizing is performed.
Please refer to the link for complete details on setting up BC Sets :
http://help.sap.com/saphelp_nw04/Helpdata/EN/cd/a22237406d183fe10000009b38f889/content.htm
# Please spare some time to put a comment, if this post was relevant for you or not. It helps me post better content
Wednesday, July 15, 2009
. Item does not match schedule line ( program error ) message no . V1427
You will find may notes that can be applied up till version 4.6c . But for versions after that you can refer to the SDN forum link where I had a similar Query discussed.
Notes for versions 4.6c and before are also mentioned under the link.
https://forums.sdn.sap.com/thread.jspa?messageID=7852907�
# Please spare some time to put a comment, if this post was relevant for you or not. It helps me post better content
Notes for versions 4.6c and before are also mentioned under the link.
https://forums.sdn.sap.com/thread.jspa?messageID=7852907�
# Please spare some time to put a comment, if this post was relevant for you or not. It helps me post better content
Sunday, June 21, 2009
. Error: Status of email is "In transit"
Please refer to the following links. They helped me clear out the errors.
1. https://www.sdn.sap.com/irj/scn/thread?threadID=1369013
2. http://sap.ittoolbox.com/groups/technical-functional/sap-basis/email-status-in-transit-2043554
# Please spare some time to put a comment, if this post was relevant for you or not. It helps me post better content
1. https://www.sdn.sap.com/irj/scn/thread?threadID=1369013
2. http://sap.ittoolbox.com/groups/technical-functional/sap-basis/email-status-in-transit-2043554
# Please spare some time to put a comment, if this post was relevant for you or not. It helps me post better content
. How to Configure email in SAP
Use:
If you want to distribute business intelligence content using e-mail, you have to set up the mail server in the SAP Web Application Server.
Procedure:
1. In the BW system, choose the transaction SAPconnect: Administration (system status) (transaction SCOT).
2. Check the status of the node SMTP (Simple Mail Transfer Protocol):
3. The node SMTP does not exist:
4. To create the node, in the menu, choose Node ® Create. Specify a node ID and a description.
5. The node SMTP is not active:
6. To activate the node, in the menu, choose Node ® Change. Select the field Node in Operation.
7. In the menu, choose Node ® Change. The screen SAPconnect: General Node Data opens. Ensure that the following values are defined:
8. Mail Host: for example, mailto.wdf.sap.corp (localhost is generally not a valid mail host because both a mail server and SAP Application Server are generally not installed on a PC at the same time)
a. Mail Port: Standard value for SMTP is 25
b. Code page: Standard values are 1100 or 1140
c. Supported address types
9. Select the Internet field and choose Setup. The screen SAPconnect: Address Type for Node opens. Enter * in the address area.
10. To maintain the standard domain, in the menu, choose Settings ® Default Domain and enter the appropriate value (for example, sap.com for e-mail addresses, such as @sap.com).
See also:
Error: Status of the messages is showing as "In transit"
# Please spare some time to put a comment, if this post was relevant for you or not. It helps me post better content
If you want to distribute business intelligence content using e-mail, you have to set up the mail server in the SAP Web Application Server.
Procedure:
1. In the BW system, choose the transaction SAPconnect: Administration (system status) (transaction SCOT).
2. Check the status of the node SMTP (Simple Mail Transfer Protocol):
3. The node SMTP does not exist:
4. To create the node, in the menu, choose Node ® Create. Specify a node ID and a description.
5. The node SMTP is not active:
6. To activate the node, in the menu, choose Node ® Change. Select the field Node in Operation.
7. In the menu, choose Node ® Change. The screen SAPconnect: General Node Data opens. Ensure that the following values are defined:
8. Mail Host: for example, mailto.wdf.sap.corp (localhost is generally not a valid mail host because both a mail server and SAP Application Server are generally not installed on a PC at the same time)
a. Mail Port: Standard value for SMTP is 25
b. Code page: Standard values are 1100 or 1140
c. Supported address types
9. Select the Internet field and choose Setup. The screen SAPconnect: Address Type for Node opens. Enter * in the address area.
10. To maintain the standard domain, in the menu, choose Settings ® Default Domain and enter the appropriate value (for example, sap.com for e-mail addresses, such as @sap.com).
See also:
Monitoring the Sending of E-mails
Error: Status of the messages is showing as "In transit"
# Please spare some time to put a comment, if this post was relevant for you or not. It helps me post better content
Wednesday, June 17, 2009
-104: DBM command impossible at this time
Reason for error:
You have attempted to execute a database management statement. You cannot execute this statement if another database statement is already running.
Solution:
Execute the statement later.
# Please spare some time to put a comment, if this post was relevant for you or not. It helps me post better content.
Friday, June 12, 2009
. Configuring the Sender RFC Adapter / How to Register Server Program ID
So here we go, basically we have to configure 2 things:
a) RFC destinationb) RFC channel in the XI directory
RFC destination:
1. To create the RFC go to TCODE: SM59
2. Create new destination of type T (TCP/IP)
3. Select Registered Server Program option before writing your program ID
4. Write you program ID (remember it's case-sensitive)
5. In the gateway host and gateway service write the values of your "Application system" - business system (not the XI server)

6. No configuration in the J2EE administrator nessecary
Now we can proceed to RFC channel configuration:
1. Enter your Application Server
2. Your Application Server Service
3. Enter your Program ID from the RFC destination

Now you can test the RFC destination in SM59 to see if it works.
Also check notes : 353597 & 63930
Further Reading:
1. RFC Processing with the RFC Adapter - help.sap.com
2. Configuring the Sender RFC Adapter - help.sap.com
# Please spare some time to put a comment, if this post was relevant for you or not. It helps me post better content.
Sunday, June 7, 2009
. How to Raise an Event from Unix / How to trigger an Event in SAP
An SAP event is a "flag" that is created in SAP (SM62). This event (or flag) can be triggered (from a Unix job to an incoming file), causing a job to execute in the background. This event (or flag) can be triggered within R/3 or can be done at the Unix level.
* First, create an event in SM62. It’s easy - just create it under "user event names" and "maintain". You’ll find the create option from there.
* Once created go to SM36 and create the job. Put in the job name you want to call it - fill in the ABAP/4 program you’ll want executed, but under "START DATE" select option AFTER EVENT. Then plug in your SAP event name you created. Fill in the remaining information on this screen and save.
* Once saved, an entry is put in table BTCEVTJOB. The entry is the name of the event you raised. This is the system’s way of keeping track of which jobs are in the queue waiting for an event to occur.
* Now, once the event is triggered this newly created job will execute. The event can be triggered via sap (SM64) or at the Unix level.
SM64 is pretty self-explanatory. To get the event triggered from Unix:
* Log into the adm user id at the Unix level and go to directory /usr/sap/SYS/exe/run (there is an alias called 'cdexe' that will get you there)
* From there look for an executable called sapevt. Open another Unix window cause now you are going to need to cut and paste.
* At the other sap window switch user to the adm user and go to the /usr/sap/SYS/profile directory ('cdpro' is the alias)
* Do an "ll | more" and look for the instance profile name (the sapevt executable will want this!) Example: _DVEBMGS00_
* Go back to the sapevt window and enter this command to get the event to raise:
sapevt -t pf= nr=
* Example: sapevt roberts_test -t pf=/usr/sap/SYS/profile/
_DVEBMGS00_ nr=00
* This will raise the event, and cause the job scheduled within SAP to execute.
* Once the job has executed the SAP event that was in the table BTCEVTJOB will disappear.
*Another table, TABTCO, will now have an entry in it with the SAP job that was executed. Once you’ve found that job name in this table you can double click on its entry and see that it was executed via an event.
# Please spare some time to put a comment, if this post was relevant for you or not. It helps me post better content.
. What is an Index / Creating an Index in SAP
You can search a table for data records that satisfy certain search criteria faster using an index.
An index can be considered a copy of a database table that has been reduced to certain fields. This copy is always in sorted form. Sorting provides faster access to the data records of the table, for example using a binary search. The index also contains a pointer to the corresponding record of the actual table so that the fields not contained in the index can also be read.
The primary index is distinguished from the secondary indexes of a table. The primary index contains the key fields of the table and a pointer to the non-key fields of the table. The primary index is created automatically when the table is created in the database.
Table SCOUNTER in the flight model contains the assignment of the carrier counters to airports. The primary index on this table therefore consists of the key fields of the table and a pointer to the original data records.

You can also create further indexes on a table in the ABAP Dictionary. These are called secondary indexes. This is necessary if the table is frequently accessed in a way that does not take advantage of the sorting of the primary index for the access. Different indexes on the same table are distinguished with a three-place index identifier.
All the counters of carriers at a certain airport are often searched for flight bookings. The airport ID is used to search for counters for such an access. Sorting the primary index is of no use in speeding up this access. Since table SCOUNTER has a large number of entries, a secondary index on the field AIRPORT (ID of the airport) must be created to support access using the airport ID.

The optimizer of the database system decides whether an index should be used for a concrete table access (see How to Check if an Index is Used?). This means that an index might only result in a gain in performance for certain database systems. You can therefore define the database systems on which an index should be created when you define the index in the ABAP Dictionary (see Creating Secondary Indexes.)
All the indexes existing in the ABAP Dictionary for a table are normally created in the database when the table is created if this was not excluded in the index definition for this database system.
If the index fields have key function, that is if they already uniquely identify each record of the table, an index can be defined as a unique index.
See also: What to Keep in Mind when Creating Secondary Indexes
Other Reference Links:
http://www.sap-img.com/business/what-is-meant-by-primary-index-and-secondary-index.htm
http://sap.ittoolbox.com/groups/technical-functional/sap-basis/how-to-create-index-in-abap-dictionary-in-sap-1089196
# Please spare some time to put a comment, if this post was relevant for you or not. It helps me post better content.
Tuesday, June 2, 2009
. SAP events transaction code
All the SAP events are mentioned in the transaction Code SM64.
# Please spare some time to put a comment, if this post was relevant for you or not. It helps me post better content.
# Please spare some time to put a comment, if this post was relevant for you or not. It helps me post better content.
Monday, May 18, 2009
. Short Dump STRING_OFFSET_TOO_LARGE
ABAP Short Dump:
Runtime Errors: STRING_OFFSET_TOO_LARGE
Exception: CX_SY_RANGE_OUT_OF_BOUNDS
Program: SAPLSBSP_URL_GENERATION
Keywords:
"STRING_OFFSET_TOO_LARGE" "CX_SY_RANGE_OUT_OF_BOUNDS"
"SAPLSBSP_URL_GENERATION" or "LSBSP_URL_GENERATIONU01"
"BSP_URL_GENERATION"
What happened?
"Error in the ABAP Application Program
The current ABAP program "SAPLSBSP_URL_GENERATION" had to be terminated because
it has come across a statement that unfortunately cannot be executed."
Solution: I think this error is situational. For me this error came at a time when I was also facing the below error on the url.

Check the status of ICM under tcode : SMICM

If this is under maintenance mode as in the screen shot. Then you need to change it back to Running. But before changing it please make sure from the relevant stake holders that might be involved why this was done and if you can change it back to Running.


# Please spare some time to put a comment, if this post was relevant for you or not. It helps me post better content.
Friday, May 15, 2009
. Processing multiple Blocked Queues together
You can use these programs with help from Basis.
RSQOWKEX for Outbound
RSQIWKEX for Inbound
# Please spare some time to put a comment, if this post was relevant for you or you still need help. We shall reply to your queries.
RSQOWKEX for Outbound
RSQIWKEX for Inbound
# Please spare some time to put a comment, if this post was relevant for you or you still need help. We shall reply to your queries.
Wednesday, May 6, 2009
. Error Message : Process cancelled by user
Message Number : 0K415
Some times you have problems printing some reports. You might get the message "Process cancelled by user", just after you click to print.
Follow the below steps to solve the problem.
Please note that this solution is at specific user level. It won't solve the problem for all the users. Any user who is having this problem shall have to follow this solution specifically.
1. Generate the report.
2. Go to Menu- List -> Print
3. Select the Output Device.
4. Select the Number of Copies & Pages.
5. Go to Properties -> Specifications
6. You shall see that " Field Default Value" has the printer that you selected.
7. Click on Copy Settings.
8. Once you click Copy, the Printer is added in the fields below.
9. Click ok to everything.
10. This time when you click ok, you shall receive the same message again. Print again and the error won't come again.
# Please spare some time to put a comment, if this post was relevant for you or you still need help. We shall reply to your queries.
Sunday, May 3, 2009
. Short Dump SNAP_NO_NEW_ENTRY
What to do when you get ABAP runtime error SNAP_NO_NEW_ENTRY

This dump arises when the SNAP table that loads all the records of short dumps reaches a bottleneck..
Solution:
Go to transaction: ST22.
Goto ->Reorganise


# Please spare some time to put a comment, if this post was relevant for you or you still need help. We shall reply to your queries.

This dump arises when the SNAP table that loads all the records of short dumps reaches a bottleneck..
Solution:
Go to transaction: ST22.
Goto ->Reorganise


# Please spare some time to put a comment, if this post was relevant for you or you still need help. We shall reply to your queries.
Thursday, April 23, 2009
. Different BRRESTORE Commands
Different Options in BRRESTORE
1. brrestore -b last -m all
Restore all tablespaces without the control file and online redo log files, starting from the last successful backup.
2. brrestore -b bcnmhluz.aft -m full
Restore all the files from backup bcnmhluz.aft , including the control file and the online redo log files. Restore the mirror copies of the control file and the online redo log files.
3. brrestore -m /usr/sap/C11/SYS/profile
Restore the SAP profiles.
4. brrestore -m /usr/sap/C11/SYS/exe/run:sapdba
Restore the SAPDBA executable.
5. brrestore -m /oracle/C11/sapdata1=/oracle/C11/sapdata5
Restore all the database data files that were originally stored in the subdirectories of /oracle/C11/sapdata1 in directory /oracle/C11/sapdata5 .
6. brrestore -b last -m 1-10,01-04,0
Restore all the database data files with ORACLE file IDs from 1 through 10, the four online redo log files, and the control file starting from the last successful backup. Restore the mirror copies of the control file and the online redo log files.
7. brrestore -m 0
Restore the control file. Restore the mirror copies of the control file.
8. brrestore -b last -m /oracle/C11/sapdata2/ddicd_5/ddicd.data5
Restore a database data file starting from the last successful backup.
9. brrestore -a 200-220
Restore the archived redo log files with the log sequence numbers from 200 through 220 into the archiving directory.
10. brrestore -a 40-70=/oracle/C11/sapbackup, 71-90=/oracle/C11/sapreorg
Restore the archived redo log files with the log sequence numbers from 40 through 70 in directory sapbackup and those with the log sequence numbers from 71 through 90 in directory /oracle/C11/sapreorg .
11. brrestore -a 40-69,70-100=/oracle/C11/sapbackup
Restore the archived redo log files with the log sequence numbers from 40 through 69 in the archiving directory, and those with the log sequence numbers from 70 through 100 in directory sapbackup .
12. brrestore -n det_log
Restore a detail log to the local working directory.
# Please spare some time to put a comment, if this post was relevant for you or you still need help. We shall reply to your queries.
Wednesday, April 8, 2009
. Visitors
Greetings,
It shows that my efforts to promote this blog is not going a waste. I have seen a good inflow of Visitors, some new some returning. Check out from where am I getting my Visitors.

(source- Google Analytics)
The posts in my blog are generally issues that I might have faced or some times those which I've found from various sources and found them useful enough.

(source- Google Analytics)
I am open to suggestions from all visitors regarding not only the content, but also the layout of my blog. I recently started with an effort to provide "Live Support" using 'Gmail' messenger, which is very common amongst you guys. So if you catch me online then "Just Ask" or even e-mail me.
If you have something useful to share then do let me know.
Thanks again, keep visiting & posting. :)
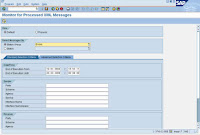
. Clearing inbound queue stuck in XI server
1. Go to transaction SMQ2 in XI server for checking inbound queue.
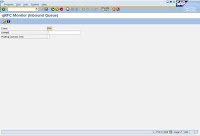
2. Click on execute button than you get display the queue.
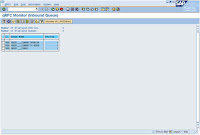
Double click it …select and Click unlock queue button and referesh…
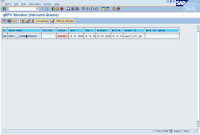
3. after referesh it will be cleared, if not than GO to transaction SXMB_MONI
4. Execute monitoring for processed XML messages.
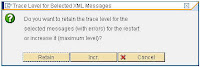
5. Then select ERRORS options from drag box from STATUS GROUP and execute.
6. Select error message and Click on restart button
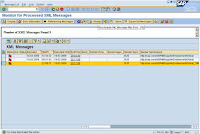
Click on RETAIN button.
7. Error message rescheduled.
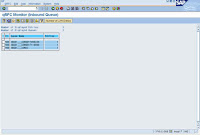
8. You can check SMQ2 Transaction that inbound queue is clearing in XI Production server.

2. Click on execute button than you get display the queue.

Double click it …select and Click unlock queue button and referesh…

3. after referesh it will be cleared, if not than GO to transaction SXMB_MONI

4. Execute monitoring for processed XML messages.
5. Then select ERRORS options from drag box from STATUS GROUP and execute.

6. Select error message and Click on restart button

Click on RETAIN button.

7. Error message rescheduled.
8. You can check SMQ2 Transaction that inbound queue is clearing in XI Production server.

Monday, April 6, 2009
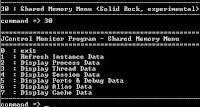
. Using jcmon tool
We are familiar with the dpmon tool which is used for monitoring and administering work processes in an ABAP environment.
Similarly we have another tool names Jcmon for the monitoring and administering Java systems from OS level.
1. Login to the SAP server usingadm.
2. Open the command prompt and launch Jcmon.
The command for jcmon in > jcmon pf="full path of the instance profile file"
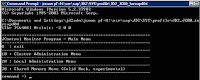
3. From the cluster administration you can perform the administering the whole Java system. Similarly from Local Administration you can perform administration of the node in which you are currently connected.
4. Go for Cluster Administration (10).
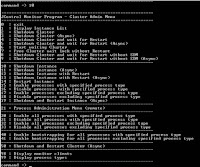
5. From here you can perform all operation which you can perform from SMICM in a dual stack environment.
6. Similarly using Shared Memory Menu you can perform refreshing shared memory etc.
Similarly we have another tool names Jcmon for the monitoring and administering Java systems from OS level.
1. Login to the SAP server using
2. Open the command prompt and launch Jcmon.
The command for jcmon in > jcmon pf=

3. From the cluster administration you can perform the administering the whole Java system. Similarly from Local Administration you can perform administration of the node in which you are currently connected.
4. Go for Cluster Administration (10).

5. From here you can perform all operation which you can perform from SMICM in a dual stack environment.
6. Similarly using Shared Memory Menu you can perform refreshing shared memory etc.

Friday, March 13, 2009
. EarlyWatch - Unformatted VB Run-time error '6068'
Problem: "Run-time error '6068” : Programmatic Access to Visual Basic Project is not trusted" while downloading Earlywatch Report from Solman.
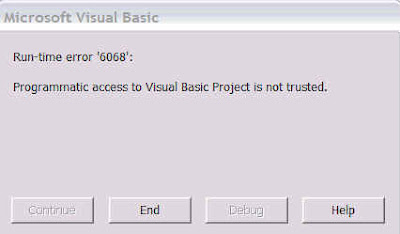
Solution:
1. Open the Office 2003 or Office XP application in question. On the Tools menu, click Macro, and then click Security to open the Macro Security dialog box.
2. On the Trusted Sources tab, click to select the Trust access to Visual Basic Project check box to turn on access.
3. Click OK to apply the setting. You may need to restart the application for the code to run properly
Refererences: http://support.microsoft.com/kb/282830
# Please spare some time to put a comment, if this post was relevant for you or you still need help. We shall reply to your queries.
. Configuring Email Alerts for Backup Jobs
For configuring email alerts for Backup Jobs first you need to configure either SQL Mail or Database Mail in SQL Server 2005.
Database mail is newly introduced concept in SQL Server 2005 and it is replacement of SQLMail of SQL Server earlier version. Database Mail has many enhancements over SQLMail. We are configuring database mail.
Configuring Database Mail
1. Login to SQL Server Management Studio.
2. Expand the tree named ‘Management’.

3. Double click on Database mail.
4. Select the first option for configuring Mail profile and accounts.

5. Write down Profile Name and Description and click on the Add button for creating new account.
6. Fill up the details as seen in the screenshot.

7. Click Next and Finish.
Now Database mail has been configured.
Activation of Database Mail
For activation of database mail open a New Query window. Run the following queries.

Send Test Mail
For sending Test Mail open a New Query Window. Run the following script.

Check the status of the sent mails
To check the status of the sent mails run the following queries.
SELECT *
FROM sysmail_mailitems
GO
SELECT *
FROM sysmail_log
GO
Configuring Backup Jobs
Right click to the existing job for which you want to configure the mail alerts and go to the properties.
In the Notification tab there is a concept called Email. Don’t get confused, it is only be activated when we configure SQL Mail. As we are using Database mail we have to configure the job in a different way.
1. Go to the Step, Click on the New Button.

2. Add the New step as described below. (Change the system Name and Description accordingly.)

3. Now go back to the original Job step and open it in the edit mode.
4. Go to the advanced tab.

5. Change the action on failure. Change it to the Go to Next Step. (Don’t change it to ‘Go to Step n….)

6. Click Ok -> Ok for confirmation.
7. Job Alerts has been scheduled.
Saturday, February 28, 2009
. Administration Books
Some of the books which I feel are helpful if you are starting with Basis Administration :


- SAP R/3 System Administration
German title: SAP R/3 Systemadministration

- SAP Performance Optimization Guide
German title: SAP Performanceoptimierung

- SAP Change and Transport Management
German title: SAP Änderungs- und Transportmanagement
- SAP Security and Authorizations
German title: Sicherheit und Berechtigungen in SAP-Systemen

. Transaction Codes in SAP
Please refer to the Pdf. Its a nice guide to the various transaction codes in SAP for all important chapters.
Click to Download -> List of Transaction Codes....
- First steps
- Software Logistics
- Client Administration
- User & Authorization
- Background Processing
- Update
- Output Configuration & Administration
- Data Archiving
- Data Transfer & Exchange
- Instance Maintenance
- System Monitoring
- Monitoring Architecture
Click to Download -> List of Transaction Codes....
Friday, February 27, 2009
. Parameters Change History
Goto Tcode - TU02 & Click on the system where the parameter is changed.

It will take you to the History of parameters in the required system

For example, for this particular parameter :
‘ login/no_automatic_user_sapstar ’ , the modification dates along with modified values are shown as follow :


It will take you to the History of parameters in the required system

For example, for this particular parameter :
‘ login/no_automatic_user_sapstar ’ , the modification dates along with modified values are shown as follow :

Tuesday, February 24, 2009
. Creating Index in Trex
1. In SAP Run SES_ADMIN


2. Warning comes “RFC Destination in table COM_SE_SEARCH not defined”
Choose system settings and define the RFC destination which is same as the RFC between TREX and ECC as shown below


Now choose create indexes

(For example we want to search store articles)


This is how an Index for searching store articles is created.
Thursday, February 19, 2009
. Controlling CCMS Agents
Hi,
Please refer to the link below. ( Controlling CCMS Agents in the left pane ).
http://help.sap.com/saphelp_nw04/helpdata/EN/48/6a76607a7c91409474ad6c7b6f5a26/frameset.htm
Please refer to the link below. ( Controlling CCMS Agents in the left pane ).
http://help.sap.com/saphelp_nw04/helpdata/EN/48/6a76607a7c91409474ad6c7b6f5a26/frameset.htm
Wednesday, February 18, 2009
. Uploading .par files to Portal
Hi,
Please follow the below path,
1. System Administration > transport > Transport Packages > Import > select client > Browse n Upload
After Upload you shall see a screen as below for successful completion,

Please follow the below path,
1. System Administration > transport > Transport Packages > Import > select client > Browse n Upload
After Upload you shall see a screen as below for successful completion,

Subscribe to:
Posts (Atom)